| Version 47 (modified by , 12 years ago) (diff) |
|---|
This page describes the most convenient method for setting up a Flarmradar Ground Station. This component reads out the flarm device and streams the data it to the Flarmradar Server. More specific solutions (WLAN, mobile Stations, etc) are described in the Advanced Construction Manual

Flarm Radar Groundstation Construction Guide
Before you start
While the ground station can be built in short time, consider that it takes a considerable amount of time for finding a good spot on the airfield. A direct line of sight to the entire runway and the open sky are optimal conditions to achieve a good result.
Prerequisites:
- a Flarm device, equipped with the latest Firmware (at least 5.09 from 2013/03/01) and a GPS receiver
- a working internet connection from the place where ground station is installed
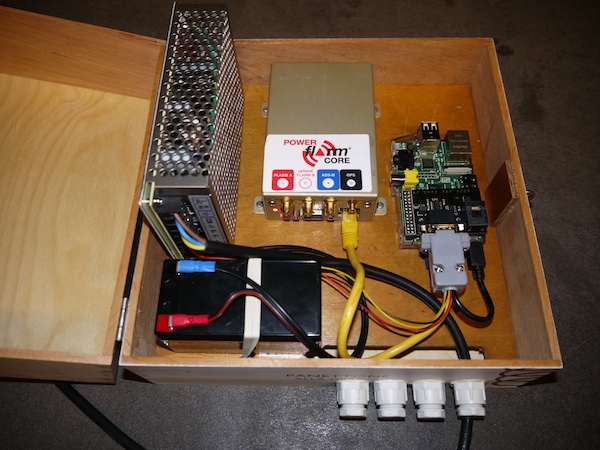
Components to buy:
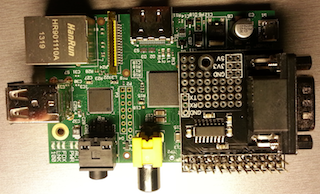
- a Raspberry PI Type B, order also a pre-formatted SD card
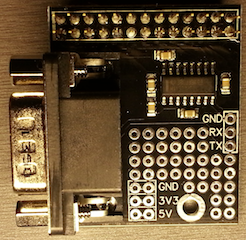
- the rs232 communication board for the Raspberry (the board can be ordered here, make sure to order also the distance piece, it makes board fixation much more robust)
- a power supply for 12V and 5V (e.g. Mean Well ADD-55A)
- an external antenna for the flarm device (e.g. this one
- a box to incorporate and connect all components (e.g a small Peli Case, 25x25x12cm minimal interior dimensions)
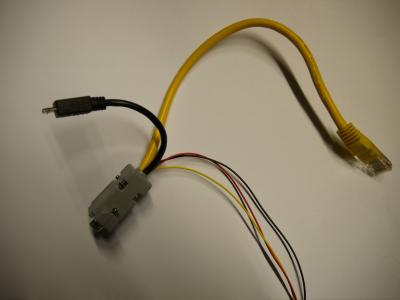
- for the communication cable between Flarm, Raspberry and Powersupply
- a short RJ45 cable (will be cut in parts)
- a 9-Pin Sub-D connector
- a micro-usb connector cable (will be cut in parts)
- alternatively: Order a pre-built cable from info@…
Step-by-Step
Bring the Raspberry into service
We use Raspbian (a descendant of the Linux Debian operating system), You will need a USB keyboard (a USB mouse is optional but helps) and a screen which connects to Chinch-video signal or HDMI for initial OS setup. Once your Pi is connected to the network, you can disconnect the peripherals and access it remotely via SSH (verify that ssh is enabled after setting up the OS).
The communication cable
The communication cable has multiple functions
- transport the RS232 signal from the Flarm device to the Raspberry
- power supply for the Flarm device
- power supply for the Raspberry
Heat up your soldering iron and craft your own or contact mailto:info@… if you would like to obtain a cable from us. We probably can help out.
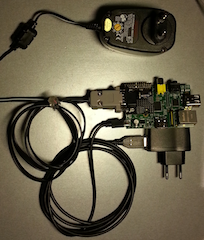
Assemble & wire the components
Mount the RS232 Communication Board on the Raspberry, disable console output and boot messages on the serial interface.
Then plug in the Sub-D plug into the plug socket of the RS232 Communication Board. Also connect micro-usb cable with the Raspberry's power supply socket. Finally connect the 3 cables with GND (black), +12V (red) and +5V (yellow) with your power supply.
Then turn on the power supply. You should see the Raspberrys LEDs light up, indicating that the 5V power supply is working correctly.
Connect GPS receiver and antenna with the Flarm device. Connect the RJ45 connector from the communication cable with the Flarm device. The Flarm should initiate the boot sequence immediately.
Finally connect the Raspberry to the network.
Establish communication between Flarm and Raspberry
Note: 19200 baud is the recommended minimum baud rate. Use FlarmTool to figure out your current settings.
- Log on the Raspberry (as user 'pi') and install required dependencies
$ sudo apt-get update && apt-get install zip dnsutils libwww-perl libdevice-serialport-perl minicom
- Configure minicom
$ sudo minicom -s
Configure the device (/dev/ttyAMA0) and make sure that the baud rate matches with the settings of your Flarm device. Save the configuration file.
- Once the configuration is correct you must be able to see live position data when you start minicom:
$ sudo minicom
....
$GPRMC,123512.00,A,4710.24781,N,00902.46662,E,0.017,237.67,240312,,,A*6E
$GPGGA,123512.00,4710.24781,N,00902.46662,E,1,8,1.40,413.2,M,48.0,M,,*6E
$PFLAA,0,-118,-85,1,1,4B51BC,0,,0,0.1,1*1E
$PFLAA,0,-35,-124,2,1,4B51FF,158,,0,0.1,1*14
$PFLAU,2,1,1,1,0,,0,,*61
$GPRMC,123513.00,A,4710.24782,N,00902.46659,E,0.002,237.67,240312,,,A*60
$GPGGA,123513.00,4710.24782,N,00902.46659,E,1,8,1.40,413.1,M,48.0,M,,*67
....
If you succeed with this: Congratulations, you're nearly done :-)
Download the software package The software is installed via Follow the installation procedure to install the client software.
Software Installation & Testing
- Download the client package from http://www.flarmradar.ch/public/dist/client/pkg/
$ wget http://www.flarmradar.ch/public/dist/client/pkg/flarmclient_<version>_all.deb
- Install the package
$ sudo dpkg -i flarmclient_<version>_all.deb
- Configure the configuration file /etc/flarmclient.conf. Verify that the follwing settings are correct:
- key
- url
- baud
# The mandatory key to use to identify the client. Contact
# info@flarmradar.ch to get a client key.
key  = ... your_key ...

# Where to send the flarm data. You need to adapt this setting if you run
# your own Flarm-Radar site. If you use the public site, then you don't need
# to change this setting.
#
# Test
#url = http://test.flarmradar.ch/rest/flarmdata/records
# Production
url = http://www.flarmradar.ch/rest/flarmdata/records

...

# Use FlarmTool or a common terminal application to determine the current baud
# rate of your flarm device.
#baud = 4800
#baud = 9600
#baud = 19200
#baud = 38400
baud = 57600
Now it is time to start the client for the first time:
$sudo su - flarm -c flarmclient
Final installation
... to be written
Attachments (6)
- communication_cable.jpg (21.5 KB) - added by 12 years ago.
- ground_station.jpg (110.8 KB) - added by 12 years ago.
-
Pi_RS232_Converter.png (141.5 KB) - added by 12 years ago.
RS232 Converter attached to Pi
-
Pi_RS232_Converter.2.png (141.5 KB) - added by 12 years ago.
Pi with RS232 Converter and cables
-
RS232Converter.png (142.3 KB) - added by 12 years ago.
RS232 Converter
-
Pi_Converter_Cables.png (98.4 KB) - added by 12 years ago.
Pi with RS232 converter and cables
Download all attachments as: .zip